TL;DR (Quick Summary)
- This tutorial shows you how to make a plant timelapse from start to finish – gear, setup, shooting and editing.
- You’ll learn which camera, lens, tripod, intervalometer and lights work well for long-term timelapses.
- We cover camera settings (ISO, shutter speed, aperture) and stable lighting so your footage doesn’t flicker.
- You’ll see how to import your photos into DaVinci Resolve, turn them into a video and add color grading and music.
- Full YouTube video, gear list with links, and growing conditions are all included below.
How to Make a Plant Timelapse (Step-by-Step)
Have you ever wondered how those satisfying plant timelapse videos on YouTube are made? Or maybe you want to make your own plant timelapse and watch your sunflower, avocado or jalapeno grow in fast-forward? In this guide I’ll show you exactly how to make a plant timelapse – from choosing the gear to exporting the final video.
This tutorial is based on my own long-term timelapse projects (sometimes over months), so you’ll get a realistic workflow and not just theory. And yes, there’s a full video too.
Full Plant Timelapse Tutorial (Video)
If you prefer to watch instead of read, here’s the complete video tutorial where I walk through the whole process on camera:
If you want to go even deeper into gear and settings after this article, also check out my detailed guide: 👉 Plant Time-Lapse Equipment – All You Need
Equipment and Software You Need
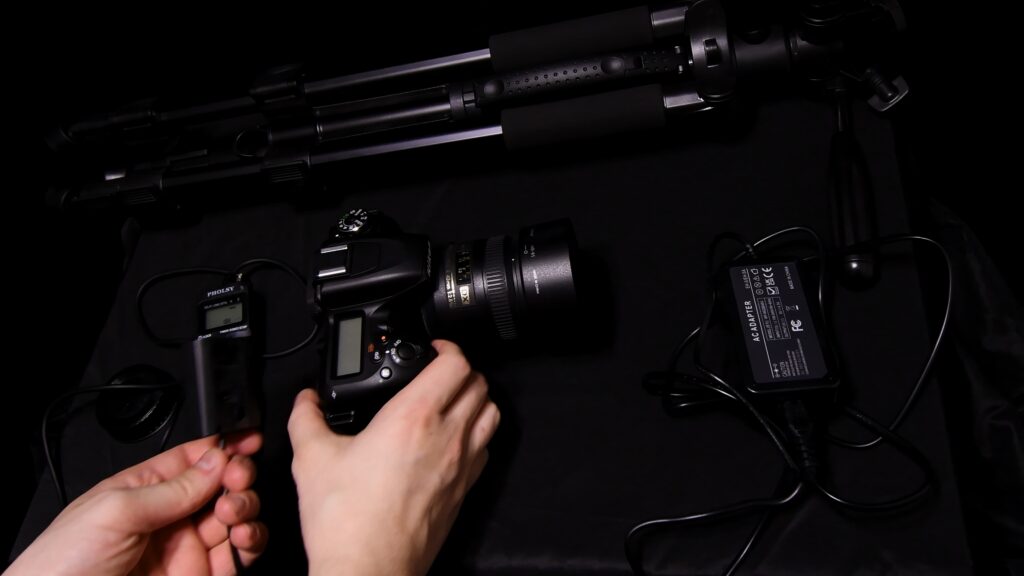
The picture above shows the core setup I use for most of my plant timelapses: camera, macro lens, tripod, intervalometer, plant lamp and a DC adapter. Here’s the basic checklist to get you started:
- Camera: I use a Nikon D7500 with a 40mm macro lens. Any DSLR or mirrorless camera that lets you shoot in manual mode works. Higher resolution gives you more freedom to crop.
- SD Card: A 128GB card or larger is ideal – long-term plant timelapses can easily create tens of thousands of images.
- Tripod: Keeps your camera locked in place for days or weeks. Stability is everything.
- Intervalometer: A remote that automatically takes photos at set intervals (every few minutes).
- DC Adapter: Powers the camera from a wall socket so you don’t have to change batteries in the middle of the grow.
- Plant Lamp: Provides consistent light using LEDs, so your plant grows well and your timelapse doesn’t flicker.
Setting Up Your Plant Timelapse
Once you have the gear, it’s time to build your little timelapse studio. This is where you decide the framing, background and lighting – and where most of the magic (or disaster) happens.
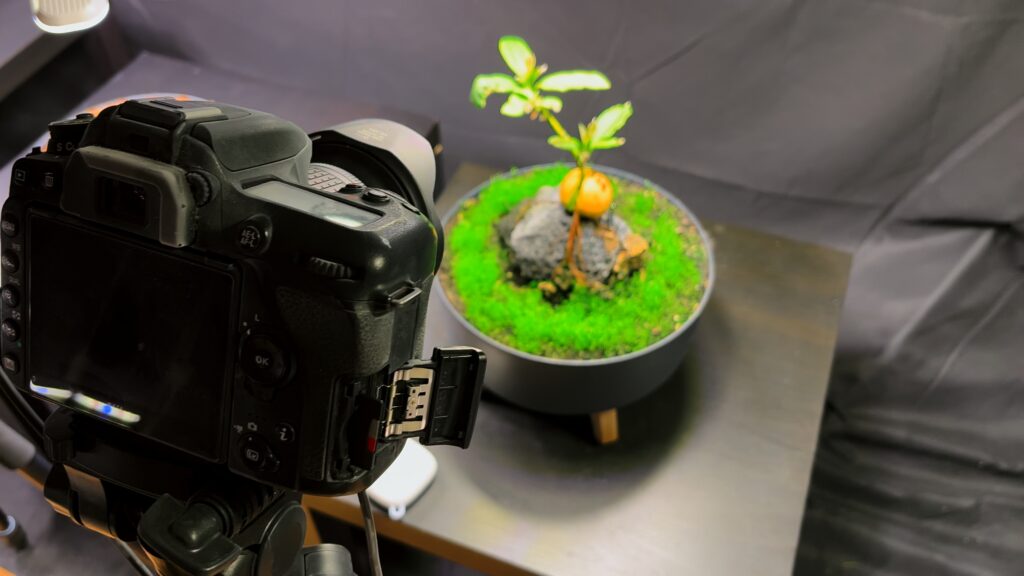
In the example above you can see one of my setups: camera on a tripod, plant in a pot, black background and a grow light above. Simple, but it works great.
- Camera Setup: Position your camera on the tripod, connect SD card, intervalometer and DC adapter. Set the camera to manual mode so exposure stays constant over time.
- Interval: For most plants I use an interval of 2–3 minutes between shots. Slower plants can be shot every 5–10 minutes.
- Lighting: Place the plant lamp above or slightly in front of the plant. You want even lighting without harsh shadows – and no changing daylight if possible.
- Focus & Exposure: Focus manually on the part of the plant that will move the most (tip, flower, etc.). Lock ISO, shutter speed and aperture so the look stays consistent.
Understanding the basic camera settings:
- ISO: Controls sensor sensitivity. Use a low ISO (100–200) if your plant lamp is bright enough – this keeps the image clean and reduces noise.
- Shutter Speed: How long the sensor is exposed to light. For plants you can usually go relatively slow (e.g. 1/30–1/4 s) because nothing moves very fast, but avoid vibration.
- Aperture: The f-stop controls depth of field. A slightly higher f-stop (e.g. f/8–f/11) keeps more of the plant in focus and is usually a good choice for timelapse.
Growing Conditions for a Smooth Plant Timelapse
Your timelapse will only look as good as your plant grows. So while we nerd out about cameras, don’t forget basic plant care:
- Substrate: Use a high-quality potting mix suitable for your plant. For dwarf sunflowers or similar, a well-draining mix works great.
- Temperature: Try to keep things stable around 18–24°C (65–75°F). Huge swings can stress both the plant and your timelapse.
- Watering: Keep the soil evenly moist but never swampy. Standing water = sad roots and moldy footage.
- Light: Aim for 12–16 hours of consistent light per day with your plant lamp. Consistency is key to avoid visible flicker.
Capturing the Growth
Now the “boring” part starts – which is actually the most important: letting the camera run and not touching anything.
- Start by filming or photographing the moment you plant the seed and cover it with soil.
- Then switch fully to the intervalometer – photos every few minutes, all day, every day.
- Regularly copy images from the SD card to your PC so you don’t run out of space and you have backups.
- Try not to move the pot or tripod. Tiny movements become very obvious in the final timelapse.
Editing Your Plant Timelapse in DaVinci Resolve
Once you’ve collected enough images (hundreds or thousands), it’s time to turn them into a video. I use DaVinci Resolve because the free version is insanely powerful.

- Software: Download DaVinci Resolve (free version is enough).
- Importing Photos: Create a new project and import your photo sequence. In Resolve you can treat a folder of images as a single clip.
- Adjusting Speed: Put the sequence on the timeline and adjust playback speed if needed to make the growth feel smooth and natural.
- Adding Effects: Add text overlays (e.g. “Day 1”, “Day 30”) and maybe a little zoom or pan (Ken Burns style) to keep the video dynamic.
- Music: Choose a fitting music track from a platform like Epidemic Sound to give your timelapse the final touch.
Here’s a peek at the color grading stage:
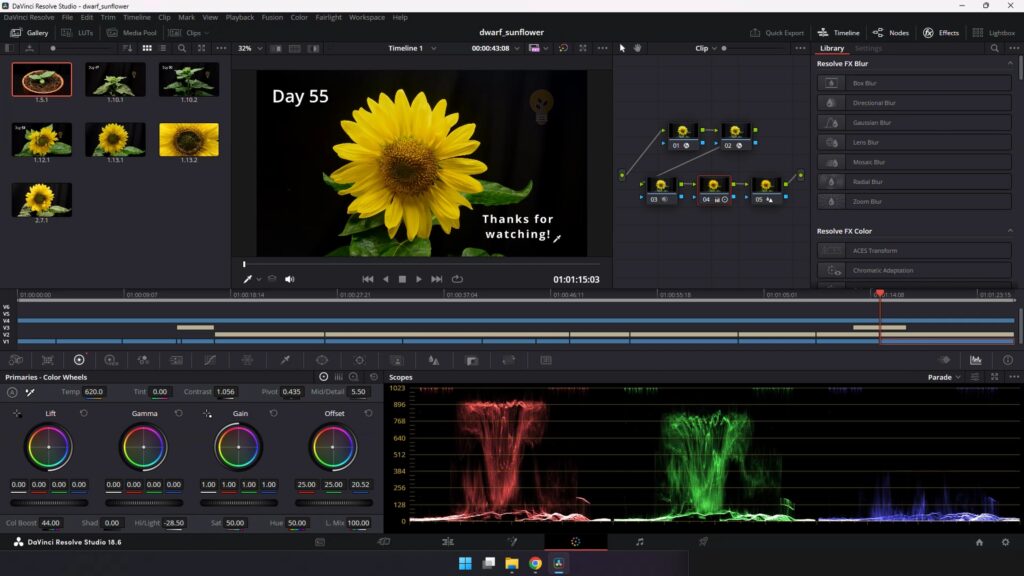
In the screenshot above you can see my color grading nodes in Resolve. A bit of contrast, some saturation and maybe a subtle vignette can make a huge difference without making the timelapse look fake.
Full Equipment List (with Links)
Here’s the gear I use or recommend for creating plant timelapses. Some of these are affiliate links – they don’t cost you extra, but they help support more plant experiments and timelapses.
Camera & Lenses
- Camera: Nikon D7500
- DSLR camera that captures high-quality images and 4K video.
- Nikon D7500
- Macro Lenses:
- Nikon AF-S DX Micro-Nikkor 40mm
- Perfect for detailed close-up shots of plants.
- Nikon 40mm Macro Lens
- Sigma 105mm F2.8 EX Macro
- Great option if you want more working distance.
- Sigma 105mm Macro Lens
- Nikon AF-S DX Micro-Nikkor 40mm
- Camera DC Adapter
- Keeps your camera powered 24/7 without swapping batteries.
- Camera DC Adapter
- Intervalometer
- Automatically takes photos at fixed intervals.
- Neewer Intervalometer
- Tripod
- Stable tripod to keep your framing locked.
- Manfrotto Compact Action Tripod
- Black Background
- Makes the plant pop and removes distractions.
- Black Background
- Plant Lamps:
- Plant Lamp #1
- Provides strong, consistent LED light for plant growth and timelapse.
- Roleadro LED Grow Light
- Plant Lamp #2
- Another solid LED grow light option.
- LED Grow Light
- Plant Lamp #1
Music & Video Editing Software
Music Source
- Epidemic Sound
- Great source for high-quality music tracks for timelapse videos.
- Epidemic Sound
Video Editing Software
- DaVinci Resolve
- Powerful video editor with a free version, perfect for timelapse editing and color grading.
- DaVinci Resolve
FAQ – Plant Timelapse Basics
How often should I take a photo?
For most plant timelapses, an interval of 2–5 minutes works well. Faster plants (like seedlings) can use shorter intervals, slower plants can handle longer ones.
How long should I film?
Anything from a few days to several months – it depends on the plant and what you want to show (germination, flowering, fruiting, etc.).
Which plants are good for a first timelapse?
Fast growers like sunflowers, beans or microgreens are perfect. If you like spicy stuff, jalapenos are also great candidates.
Why does my timelapse flicker?
Usually because of changing light (sun/clouds, auto exposure). Use constant artificial light and fully manual camera settings to avoid flicker.
External Resources if You Want to Dive Deeper
If you want to read more about timelapse techniques and editing, check out:
If You Enjoyed This Timelapse Tutorial, You Might Also Like:
Jalapeno Time Lapse: From Seed to Harvest in 155 Days – full grow and spicy harvest: Jalapeno Time Lapse
Growing an Avocado Bonsai from Seed – with detailed care tips and time lapse: Avocado Bonsai Time Lapse
How to Grow Your Own Blueberries from Store-Bought Fruits – slow but very satisfying: Blueberry Seed Grow
Follow for More Timelapses & Plant Experiments
All my social links: https://beacons.ai/interestingasfck
YouTube Timelapse: https://www.youtube.com/@interestingasfck
YouTube Tutorials: https://www.youtube.com/@interestingasfck
Instagram: https://www.instagram.com/interestingasfck.official/
TikTok: https://www.tiktok.com/@interestingasfck
Facebook: https://www.facebook.com/profile.php?id=61550590780487